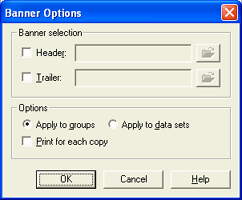
Use this dialog box to define banner options for the selected spool printer. These options affect all documents sent to the spool printer. You can access this dialog box when you add or modify a spool printer on the Configuration Utility's Spool Printers tab. From the Printer Properties dialog box, under Options, click Banners to view this dialog box.
Click an option you want to learn more about.

Selects header and trailer pages.
Sends a header page with print documents. Click the folder button to select the file that contains the header page.
Sends a trailer page with print documents. Click the folder button to select the file that contains the trailer page.
Sets optional banner settings.
When the Send after banner page option is selected on the Overlay Options dialog box, both the banner and the overlay must have the same setting for how they are applied. For example, if Send after banner page is selected and the overlay is set to Apply to groups, then the banner must also be set to Apply to groups.
Applies the headers and/or trailers to the entire print job. Each print job consists of one or more data sets that always remain with its associated print job. Selecting this option treats the print job as one group. This option is selected by default. Headers and trailers will be sent based on the selection of the Header and Trailer check boxes.
Applies the headers and/or trailers to each individual data set within a print job. Headers and trailers will be sent based on the selection of the Header and Trailer check boxes.
Sends a header and/or trailer with each copy of the print document. Headers and trailers will be sent based on the selection of the Header and Trailer check boxes.