A rule action must be specified for each rule. This dialog box offers two options when specifying an action. You can specify a rule action by assigning a field value or by routing to multiple printer destinations. Notice there are different dialog boxes for each type of rule action. You can access this dialog box when you add or modify an override table. From the Rules Editor dialog box, add or modify a rule to view this dialog box.
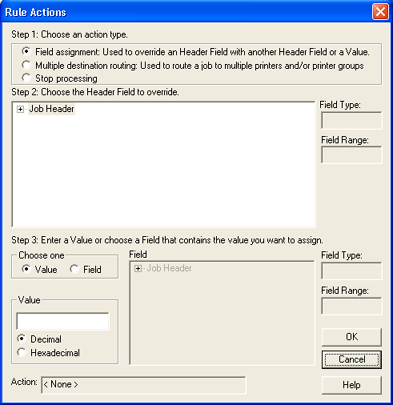
Field assignment actions are based on fields in the Job Header or Data Set Header. Actions are logical statements made up of operands and field values. You must choose the field to override, then enter the value or choose the field to assign to the overridden field.

The first step to assigning a rule action is choosing an action type. Select Field assignment to override or set a file attribute by assigning a field value. Selecting Multiple destination routing or Stop processing will cause the dialog box to change.
Select the header field you want to override with an action. Notice the Field Type and Field Range fields on the right side of the box.
|
Option |
Description |
|
Field Type |
Displays the field type for the selected field. |
|
Field Range |
Displays the field range for the selected field, when appropriate. |
Assign the override value by entering a value or assigning the value from another field.
|
Option |
Description |
|
Value |
Select to enter a specific value that will be assigned to the override field. The value can be expressed as a decimal or hexadecimal. Unlike condition statements, the operand is always = because the specified field will be equal to the value indicated when a condition applies. |
|
Field |
Select to set the override field’s value equal to another field’s value. You cannot override a job header field with a data set header field. |
|
Field Type |
Displays the field type for the selected field. |
|
Field Range |
Displays the field range for the selected field, when appropriate. |
Multiple destination routing actions are used to override or set a file attribute to multiple printer destinations.

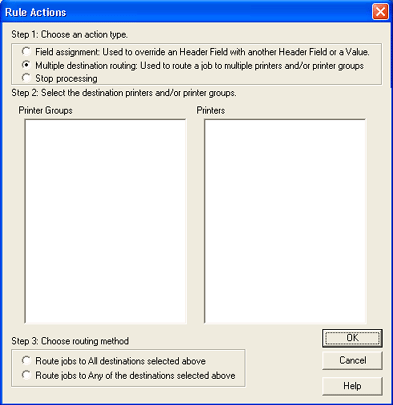
The first step to assigning a rule action is choosing an action type. Select Multiple destination routing to override or set a file attribute to multiple printer destinations. If you change the action type to Field assignment or Stop processing, the dialog box will also change.
Select the printer groups and/or printers to which you would like to print.
If you choose to Route jobs to Any destinations selected above, you can only select one printer group. Individual printers cannot be selected. If you choose to Route jobs to All destinations selected above you can select any combination of printer groups and/or individual printers.
|
Option |
Description |
|
Printer Groups |
Choose the printer group destinations from the list. Printer groups are defined in the Printer Groups tab of the Configuration Utility. |
|
Printers |
Choose the printer destinations from the list. Printers are defined in the Spool Printers tab of the Configuration Utility. |
Select to route jobs to either All or Any of the destinations selected.
Allows you to select any combination of individual printers and/or printer groups. The job will route to all of the printers. When a multiple data set job arrives in the Spool Window, a separate copy of each data set will display for each printer destination. (For example, a job with 3 data sets routing to 4 destinations will display as 12 data sets in the Spool Window.) Each data set will display the individual printer it is assigned in the BARR_PRINT and NDHBPDST fields.
Allows you to select only one printer group and no individual printers. If additional printers need to be included in the group, they must be added using the Printer Groups tab. When the job arrives in the Spool Window, the BARR_PRINT field will display "***" followed by the name of the printer group. Upon printing, data sets will route to any of the printers in the group.
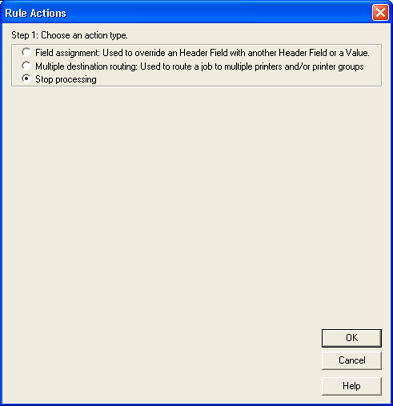
The stop processing action is used to stop the override table processing when the rule conditions are met.
This option is helpful in cases where the override table contains rules evaluating for specific criteria, such as using Jobname to set other values. This action is used once the initial match happens because there is no need to continue processing the other rule conditions. This allows you to stop processing the override table at that point to avoid wasting resources.

The first step to assigning a rule action is choosing an action type. Select Stop processing to stop the override table processing. Selecting this option will remove all of the other options listed on the dialog box. If you change the action type to Field assignment or Multiple destination routing, the dialog box will also change.