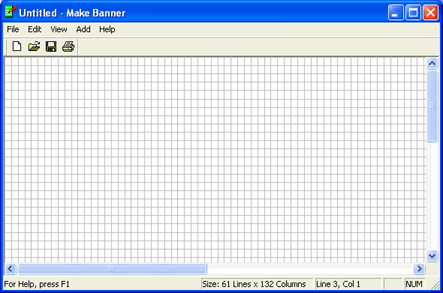
Use the Make Banner utility to easily design print job banner pages.
Click the portion of the window you want to learn more about.

The menu bar displays below the title bar. Click the following menus to learn about the available commands.
New– Creates a new document.
Open– Opens an existing document.
Save– Saves the active document. When you save a document for the first time, the Save As dialog box is displayed so you can name your document. If you want to change the name and directory of an existing document before you save it, select Save As.
Save As– Saves the active document with a new name. The Save As dialog box displays so you can name your document. To save a document with its existing name and directory, select Save.
Print– Prints the contents of the window. This command displays a Print dialog box where you can specify the range of pages to print, the number of copies, the destination printer, and other printer setup options.
Print Setup– Changes the printer and printing options. This command displays the Print Setup dialog box.
Recent File– Opens this document.
Exit– Closes the Make Banner window.
Banner Size– Specifies the size of the banner page by number of lines (height) and columns (width). Standard banner pages have 66 lines when printing 6 lines per inch and 88 lines when printing 8 lines per inch. The standard number of columns is 80 for an 8.5-inch wide page and 132 columns for a 14-inch wide page.
The software starts printing at the top-left hand corner of the page. If the banner and paper size do not match, the banner might not print correctly.
Toolbar– Displays or hides the toolbar, which includes buttons for some of the most common commands in the Make Banner utility. A check mark appears next to the menu item when the toolbar is displayed. You can drag the toolbar to other areas of the Make Banner window.
Zoom– Sets the magnification level when displaying banner pages. The zoom feature enlarges or reduces the display of your document as a percentage of its actual size.
Text Item– Specifies where text will begin printing. You can include header fields in the text box by clicking Insert Field. If the text or header fields you enter in the text box extend beyond the specified banner width, the text or field will truncate. The purple shading indicates the maximum length of the string when printed.
Repeating Text– Specifies where repeating text will begin printing. The text you enter in the text box prints repeatedly across the page to the specified banner width. You can include header fields in the text box by clicking Insert Field.
Block Text– Specifies where 12 x 12 blocks of text will print. It prints in a normal font unless you click the Italic box. You can include header fields in the text box by clicking Insert Field.
Text Column– Specifies where the text box will begin and end printing. You can include header fields in the text box by clicking Insert Field. The blue shading indicates the maximum length of the string when printed.
Contents and Index– Opens the Help.
Barr Systems on the Web– Opens the Help with links to the Barr Systems Web page.
About Make Banner– Displays the program information, version number, and copyright.
The toolbar provides quick access to commands. To hide or display the toolbar, on the menu bar, select View | Toolbar. To move the toolbar, click the toolbar and drag it to a new location.

New – Creates a new document.
Open – Opens an existing document.
Save – Saves the active document.
Print – Prints the contents of the window.

The left end of the status bar describes menu item actions as you use the arrow keys to navigate through menus. It also describes actions when you pause the mouse pointer over a menu item or toolbar button. The right area of the status bar displays the following information.
Size – Displays the banner size.
Pointer position – Displays the your current location on the banner page.
CAP – The CAPS LOCK key is latched down.
NUM – The NUM LOCK key is latched down.