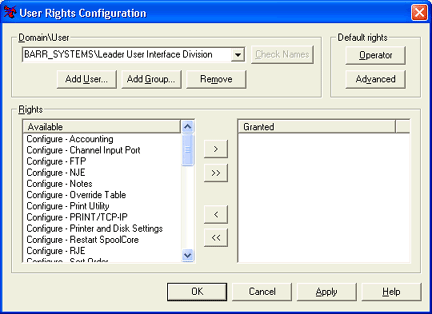
Use the User Rights Configuration window to assign selected access rights to a user or group of users.
To access the User
Rights Configuration utility, you must be a member of the local Administrators group or be assigned
the Configure - User Security
right. Users with these rights can add and remove users or groups and
modify the assigned rights.
Changes to user rights will take effect
within one hour, or you can change them immediately by restarting the
computer.
Click the portion of the window you want to learn more about.

Displays the registered domain and the corresponding user or group. For each user or group, there must be a specified domain.
Members of the local Administrators group are automatically granted all user access rights. These users automatically appear in the Domain\User drop-down list. Their rights can be modified as needed.
Add User button – Adds a user to the utility so rights can be assigned. Until a user has been added, either individually or within a group, no rights will be assigned and the user can only view the spool screen. The Select Resource dialog box displays.
Add Group button – Adds a local or network group to the utility so rights can be assigned. User rights are cumulative. If rights are assigned to two groups and a user is a member of both groups, then the user will be granted the composite set of rights. Until a user has been added, either individually or within a group, no rights will be assigned and the user can only view the spool screen. The Select Resource dialog box displays.
Remove button – Disables all rights from the selected user name or group name.
The Operator and Advanced rights are only suggestions to help you get started. Rights must be added or removed to meet the needs of the organization.
Operator button – Assigns a pre-configured list of rights that are typically granted to an operator.
Advanced button – Assigns a pre-configured list of rights that are typically granted to an advanced user, usually a supervisor or manager.
For each user or group, rights are either available or granted. Rights can be added or removed by moving the item from one column to another. The Using the User Rights Configuration utility topic can help you get started.
Available – Displays all of the available user access rights. The following explains how the user access rights are categorized.
Configure – Assigns Configuration rights.
Document – Assigns Document rights.
Management – Assigns Management rights.
NJE – Assigns NJE rights.
Printer – Assigns Printer rights.
Retain – Assigns Retain rights.
RJE – Assigns RJE rights.
Granted – Displays all of the user access rights assigned to the selected user or group.
Enable (>) button – Assigns the selected rights to the user or group.
Enable All (>>) button – Assigns all rights to the registered user or group.
Disable (<) button – Removes the selected rights from the user or group.
Disable All (<<) button – Removes all rights assigned to the registered user or group.