 For some printers, the printer service representative must
connect the cables. See your printer manual to determine whether you need
to schedule this service.
For some printers, the printer service representative must
connect the cables. See your printer manual to determine whether you need
to schedule this service.This topic describes how to connect one or more printers to be used with the BARR/PRINT390 module. After installing the adapter as described in your CHANNEL-OUT (BT) manual, complete the following steps to connect the printers.
For some printers, the printer service representative must
connect the cables. See your printer manual to determine whether you need
to schedule this service.
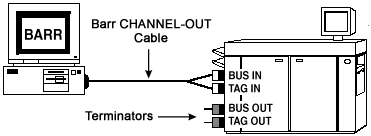
Complete the following steps to connect the CHANNEL-OUT (BT) adapter to the first S/390 channel printer using the supplied CHANNEL-OUT cable. The following graphic shows how to connect the adapter to the printer.
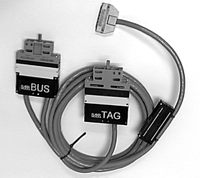
Insert the cable plug into the connector on the adapter. The cable plug is the end of the CHANNEL-OUT cable with a single plug. The other end of the CHANNEL-OUT cable has separate Bus & Tag plugs that connect to the Bus In and Tag In connectors on the printer.
 If you are also connecting to an SNA host
using BARR PRINT/CHANNEL
and the CHANNEL-IN adapter, confirm you have correctly connected the adapters
and cables. Connect the CHANNEL-IN cable to the adapter labeled IN. Connect the CHANNEL-OUT cable to
the adapter labeled OUT. The IN and OUT
adapter labels are visible from the rear of the computer.
If you are also connecting to an SNA host
using BARR PRINT/CHANNEL
and the CHANNEL-IN adapter, confirm you have correctly connected the adapters
and cables. Connect the CHANNEL-IN cable to the adapter labeled IN. Connect the CHANNEL-OUT cable to
the adapter labeled OUT. The IN and OUT
adapter labels are visible from the rear of the computer.
Attach the Bus plug to the Bus In printer connector.
Attach the Tag plug to the Tag In printer connector.
Tighten the screws that secure each connector using a screwdriver.
If you are only connecting one printer, you can attach terminator plugs to the printer.
Attach the printer to the computer. If you have
only one printer, also attach terminator plugs.
|
Plug into printer |
|
|
CHANNEL-OUT cable

You can attach multiple S/390 printers by daisy chaining one printer to another with pairs of Bus & Tag cables, as shown in the following graphic. Daisy-chain cables are available from your printer vendor.
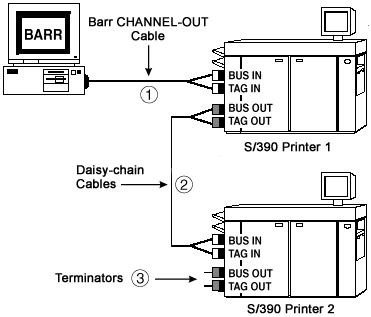
Daisy chain printers using Bus & Tag cables.
If your Bus & Tag cables are not long enough to span the distance between two printers, you can extend the cable length by connecting two pairs of Bus & Tag cables. However, you must correctly connect the cables to each other. Plugs at opposite ends of the cable have different colored edges. Usually the cable has plugs with black edges at one end and plugs with white or gray edges at the other end. Attach plugs of opposite colors, as shown in the following graphic.
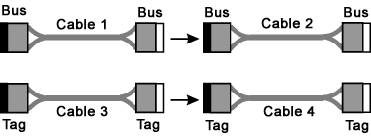
Attach Cable 1’s white Bus plug to Cable 2’s black
Bus plug.
Attach Cable 3’s white Tag plug to Cable 4’s black Tag plug.
Bus cables have a Bus connector at each end and tag cables have a Tag connector at each end. The connectors are distinguished by color-coded edges. Each cable has one connector with a black edge and one connector with a white or gray edge. When you connect Bus & Tag cables to printers, be sure to attach connectors of opposite colors.
Complete the following steps to connect the printers.
 Performance tuning:
To maximize performance, put the fastest printers at the end of the chain.
For example, put slower impact printers nearest to the adapter, and put
faster laser printers farthest from the adapter.
Performance tuning:
To maximize performance, put the fastest printers at the end of the chain.
For example, put slower impact printers nearest to the adapter, and put
faster laser printers farthest from the adapter.
Connect the Bus Out connector on Printer 1 to the Bus In connector on Printer 2.
Attach the bus cable’s black plug to Printer 1’s white Bus Out connector.
Attach the bus cable’s white plug to Printer 2’s black Bus In connector.
Connect the Tag Out connector on Printer 1 to the Tag In connector on Printer 2.
Attach the tag cable’s black plug to Printer 1’s white Tag Out connector.
Attach the bus cable’s white plug Printer 2’s black Tag In connector.
Maximum cable distance: When you daisy chain printers,
the total distance from the computer to the last printer must not exceed
60 meters (200 feet). This distance includes the lengths of the cables
and the printers.
After connecting the adapter to the printer and connecting the printers, you will need to connect the Bus & Tag terminator plugs to the printer. If you connect multiple printers, attach the terminators to the last printer in the chain. Complete the following steps to connect the terminators.
Attach the Bus Terminator to the printer’s Bus Out connector.
Attach the Tag Terminator to the printer’s Tag Out connector.
Tighten the terminator screws by hand.

 Plug into adapter